Mastering Ombre Nails: A Modern Guide to Gradient Nail Art
- By the dedicated team of editors and writers at Newsletter Station.
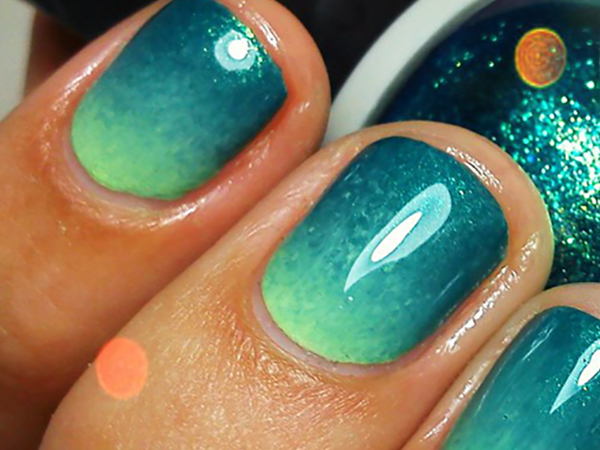
Nail art has evolved into a powerful form of self-expression, and ombre nails continue to stand out as one of the most stylish and versatile trends. Derived from the French word meaning “shaded,” ombre nails feature a seamless gradient that blends two or more colors for a soft, eye-catching effect.
Today’s ombre styles go beyond basic fades—think subtle neutrals, bold color transitions, glitter overlays, and even chrome finishes. Whether you’re a beginner or a DIY nail enthusiast, mastering ombre nails is easier than ever with the right tools and techniques.
What You’ll Need for Ombre Nails
Before you begin, gather these essential tools for the best results:
Nail Polish Colors: Choose 2–3 complementary shades. Popular combinations include nude-to-white, pink-to-red, or pastel blends for a modern look.
Base Coat & Top Coat: Protects your nails and locks in your design for longer wear. Gel-like top coats are trending for added shine and durability.
Makeup Sponge: A wedge sponge works best for creating smooth gradients.
Nail Polish Remover & Cleanup Brush: Helps tidy edges for a professional finish.
Nail File & Buffer: Ensures a smooth, even surface before applying polish.
Cuticle Oil: Keeps nails hydrated and enhances the final look.
Step-by-Step: How to Create Ombre Nails
Prep Your Nails
Start with clean, polish-free nails. Shape and file them to your desired length, then gently buff the surface to create an even base.
Apply Base Coat
Apply a thin layer of base coat and let it dry completely. This step helps prevent staining and improves polish adhesion.
Apply Your Base Color
Paint your nails with the lightest shade in your color palette. Let it dry fully before layering.
Prep the Sponge
Cut your sponge into small sections for better control and less product waste.
Add Color to the Sponge
Apply stripes of your chosen polish colors directly onto the sponge, slightly overlapping to encourage blending.
Dab to Create the Gradient
Gently press and roll the sponge onto your nail. Repeat as needed to build opacity and achieve a smooth transition.
Clean Up Edges
Use a remover and a small brush or cotton swab to clean excess polish around your cuticles.
Seal with Top Coat
Apply a glossy or gel-like top coat to smooth the gradient and add shine. This step also helps blend the colors even further.
Hydrate Your Cuticles
Finish with cuticle oil to nourish your nails and give your manicure a polished, salon-quality look.
Pro Tips for Flawless Ombre Nails
Practice Makes Progress: Don’t worry if your first attempt isn’t perfect—technique improves quickly with repetition.
Choose Trending Color Combos: Neutral ombre, seasonal tones, and soft pastels are especially popular right now.
Work in Thin Layers: This prevents streaking and helps colors blend more naturally.
Let Each Layer Dry: Rushing can cause smudging and uneven texture.
Add Creative Accents: Elevate your look with glitter, rhinestones, decals, or minimalist nail art overlays.
Why Ombre Nails Remain a Top Trend
Ombre nails continue to trend because they’re endlessly customizable. They can be subtle and professional for everyday wear or bold and artistic for special occasions. With the rise of at-home nail care and DIY beauty, this technique offers salon-quality results without a salon visit—making it ideal for busy lifestyles and small-business audiences focused on practical beauty solutions.
Mastering ombre nails is a rewarding way to elevate your nail game while expressing your personal style. With the right tools, a bit of patience, and some creative experimentation, you can achieve stunning gradient designs right at home.
Whether you prefer soft, natural fades or bold, statement-making blends, ombre nails are a timeless trend that continues to evolve—making them a must-try for any nail art enthusiast.